Sylwia's minis

Saturday, January 05, 2008

A little update!

First of all, I'm back into mini-ing and working on new project, will post pictures soon.
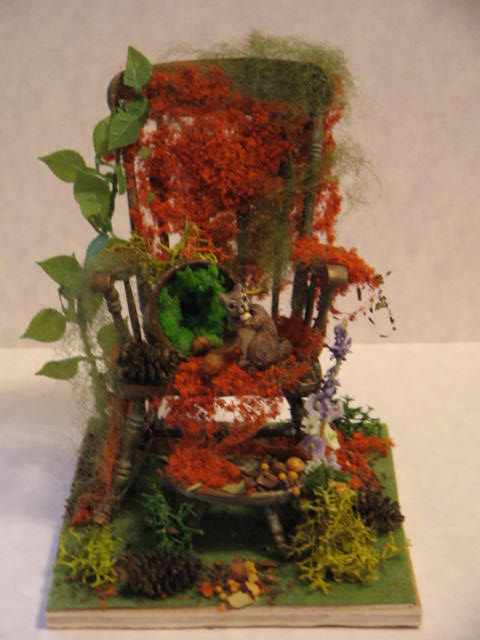
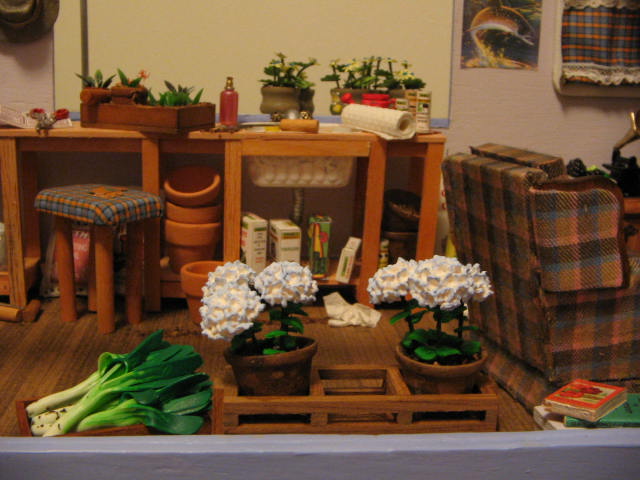
The other thing is that one of my roomboxes, Messy Room won me 2nd prize in 2006 American Miniaturist contest.

Thursday, November 02, 2006

Some more pictures of finished garden


Finished trailer with garden


After lot of thinking and planning I have it done. Unfortunately like with my other projects, it occured that I had exagerate and needed to limit the stuff I could use. I had to left over my outhouse as putting it on smaller than planned base would make my small garden overcrowded. So, I will make someday a small scene with it as focus point like back corner of garden or so.

Wednesday, October 18, 2006


This one was made plainly for fun (though I will enter it in Miniature Collector contest, lol).
This little squirrel just moved into its new nest located on some forgotten rocking chair. The chair was once used, painted nicely gold but than someone just tossed it into the garden and forgotten totally. So the chair along with stool got some patina and with time got covered with plants and nobody anylonger cared for it. Someone even left there some old plant pot. Now our squirrel decided to make herself at home here and brought all her nuts supply with her. Hopefully she will leave here happily after.

The rocker and stool are from Chrysnobon kit (I really like those kits, they proved to be so easy to put together, I'm amazed) painted with gold and than with special fluid to create patina. I covered them with different kinds of \scenic materials and plants and nuts are just some spices (they're intended for cooking crabs and seafood).

I never before tried to do something in this kind but actually I like it so much I can perhaps try some more creations of this type soon. I can consider selling it as I'm really short of space but not sure if I can part with it, lol.

Wednesday, October 11, 2006

Tomatoe plants


I'm not sure if they look right, butbelieve me, it wasn't easy to do. I used laser cut leaves, wire which I painted the same color and some tomatoe made from Fimo. I think branches are slightly too long but I had problems working with shorter ones as it was difficult to work with them.

Friday, October 06, 2006

Some more pictures of trailer


First view of trailer


My trailer is on the way to its final look. Just need to add few more details and cover it with grape vines. But mostly done.
I painted outside with cool blue and inside with ice lavender (for walls as usual I used Benjamin Morre's paint sample jars as they cover wood nicely and sample jar is usually enough for two rooms).

The idea is based on thing from Polish history. In 60's-70's most factories in Poland (oh, come on, all of them actually) belonged to goverment. They had kind of policy, especially the bigger ones. They gave to their employees small pieces of ground usually situated at suburbs. It was supposed to replace all what they were missing from their former lives at the country. So living in small city appartaments they had a chance to grow their veggies, fruits, keep rabbits and chicks and just spend there most of their free time as going on vacation somewhere else were for most of them too expensive. So they were just laborers with their small farms in their leisure time.

They usually build small gardening sheds on those grounds, some could afford more exclusive summerhouse. In some cases they just bought old trailers and addapted it. And that's the way in case of Bob and Elaine. They have this trailer from someone who didn't need it anymore. So they made their gardening shed in there. They have also place for relaxing by warm of potbelly stove. Most of those small gardens didn's have utilities like electricity, running water or else unless You could afford it. So Bob and Elaine still don't have light in there and use outhouse for the bathroom but they don't use anymore the well which stands neglected in the garden as they could afford to install running water lately.

In the trailer You can see potting bench I made from stripwood and pieces of taskboard filled with all gardening neccessities, lunch table ready for two with food made by me, two old armchairs where they can rest, potbelly stove put together from Chrysnobon kit and rusted slightly with acrylic paint, a lot of gardening books and some fishing accessories as Bob likes aside from gardening to go fishing from time to time. They just gathered their leeks so they are ready to take home. You can also notice two framed pictures, one is their wedding picture and the other is their baby long time ago when she was a small girl (just pictures from magazine and jewelry findings for frames).

It will be soon surrounded by garden with some stuff under the trailer also.

Wednesday, October 04, 2006

How to do eggplant

You will need Polymer Clay: black, dark purple or dark violet, green and some wires, the best will be thicker one which can be unswitched into few thinn ones.
First add some black to Your purple/violef clay and mix it well, You just need very dark purple, almost going into black. Shape eggplants, You can look at real one for guidance. I rolled a ball, than make it into a little elongated shape and squize one end to make it a little thinner. Take very thinn wire about 1" long, or longer for hanging eggplants, and push into shaped clay leaving half of it outside. Than shape small ball of green clay, flatten it a little and push onto wire. You can put a dot of liquid clay between eggplant and green piece. Push it slightly so they will stay together. Shape it a little with toothpick making some identation around to make it more like flower looking. Than cover rest of wire with thinn piece of green clay making sure it's completely covered. The best way is just roll down small piece to get kind of sheet and wrap it around the wire, coneccting ends and smoothing them with toothpick. Wire could be smeared with some liquid clay to get better joint. Than bake accordingly to instruction on Your clay.
To make main branches use thicker wire and cover it similarily with green clay. Bake. After baking You can paint it with some greens and browss to make the color more realistic.
Leaves are 5-fingers ones and I dind't have right cutter so I rolled thinn sheet of green clay using pasta machine and than cut my leaves randomly, getting different shapes and sizes, just trying to keep them 5-fingers. I embossed each of them pushing leave mold, You can also use some plastic or silk leave to get more real surface. I didn't leave them flat but made them more like curled down and different in shapes. After baking I touched them randomly woth some green shades of paint.
Assembly is very easy. Make any kind of base.I made mine from air drying clay. Painted it with mix of glue and brown paint, covered it with dried tea leaves and than pushed my main branches into it. Than I attached using crazy glue (as it catch joints quickly and don't make You keeping every one a long time in fingers) branches with eggplants and all the leaves, trying to cover with them all joints between main steams and smaller ones. And tada! Done.

Tuesday, October 03, 2006

More items for the garden.


Meanwhile I was working on some other items for the garden. First I made some fancy flowers using paper punches and a bit of colored sand. They are taken from my imagination. I planted them in wooden pots which i painted using canal boat painting style and sprayed with glaze.

Just today, when making some eggplants to filled up my store's inventory, I decided to give it a try and make an eggplant plant (funny sounds). I found several pictures on Google.com and was suprised that eggplants grow in a kind of bushes, sometimes quite tall. I also looked at leaves, the shapes of them. Than I made my plant using some wire and Polymer Clay. Interesting effect. Perhaps could do it for sell, preferably to the order. This is totally my own design.

Finished tree


So, finally my apple tree is done. It has over 450 leaves on it, all of them glued separately one after one. It looks pretty good. When it get planted in the garden, there will be some leaves under the tree, fallen.